Phoenix Framework
Phoenix is the web framework we use for all the Elixir examples in this book. It follows the Model-View-Controller (MVC) pattern. If that acronym means nothing to you, do not worry: MVC is simply a convention about "what goes where" so that every Phoenix project looks familiar. After a handful of examples you will have a feel for it.
In this chapter we create simple dynamic webpages, one step at a time. We skip the database for now, so you can focus on the moving parts of the web layer: routes, controllers, and templates.
|
Phoenix version
This book is written against Phoenix 1.8.5 on Elixir 1.20 and Erlang/OTP 28. Please check the version of the installer on your machine: To install or update it, run |
Older tutorials sometimes mention mix phoenix.new or directories
named templates/ and views/. Those are pre-1.7 conventions and no
longer exist. Everything in this book uses the modern Phoenix 1.8
layout: templates live next to their controller, and there is no
separate views/ folder.
|
Development environment
Phoenix knows three environments out of the box:
-
Development — verbose error pages, live code reload.
-
Test — used by
mix test. -
Production — the lean, optimised build that runs on your server.
We use the development environment throughout this chapter.
The base setup
The command mix phx.new <name> scaffolds a complete Phoenix project
for you. We will call ours demo:
$ mix phx.new demo --no-ecto (1)
* creating demo/config/config.exs
* creating demo/config/dev.exs
[...]
Fetch and install dependencies? [Yn] Y (2)
[...]
We are almost there! The following steps are missing:

    $ cd demo

Start your Phoenix app with:

    $ mix phx.server

You can also run your app inside IEx (Interactive Elixir) as:

$ iex -S mix phx.server| 1 | --no-ecto skips the database layer. We do not need it for the
first examples. You will add a database later in the
Ecto chapter. |
| 2 | Say Y. Phoenix will fetch all Hex dependencies and install the
frontend asset pipeline. This step takes a moment the first time, then
stays cached. |
cd into the new directory and start the server:
$ cd demo
$ mix phx.server
[info] Running DemoWeb.Endpoint with Bandit 1.10.4 at 127.0.0.1:4000 (http) (1)
[info] Access DemoWeb.Endpoint at http://localhost:4000 (2)
[watch] build finished, watching for changes...| 1 | Phoenix 1.8 ships with Bandit as the default web server. Bandit is written in pure Elixir, supports HTTP/2, and replaces the older Cowboy adapter used in early Phoenix versions. |
| 2 | The URL that serves the development site. |
Open http://localhost:4000 in your browser:
The request log you see in the terminal looks like this:
[info] GET /
[debug] Processing with DemoWeb.PageController.home/2 (1)
  Parameters: %{}
  Pipelines: [:browser]
[info] Sent 200 in 22ms| 1 | The default route calls PageController.home/2, not :index, in
Phoenix 1.8. |
Reload the page and you will see sub-millisecond response times:
[info] GET /
[debug] Processing with DemoWeb.PageController.home/2
  Parameters: %{}
  Pipelines: [:browser]
[info] Sent 200 in 426µsWhere the page comes from
The page you are looking at is rendered from a HEEx template. HEEx
stands for "HTML + Embedded Elixir" and is Phoenix’s modern templating
language. HEEx files end in .html.heex and live next to their
controller:
$ tree lib/demo_web/controllers
lib/demo_web/controllers
├── error_html.ex
├── error_json.ex
├── page_controller.ex
├── page_html
│   └── home.html.heex (1)
└── page_html.ex (2)| 1 | The HEEx template that renders the home page. |
| 2 | The HTML module that hosts the template. This replaces the old "view" concept from Phoenix 1.6 and earlier. |
Because our application is called demo, Phoenix names its web
module DemoWeb and puts it under lib/demo_web/. The matching Elixir
module for the home-page template is DemoWeb.PageHTML.
|
Open lib/demo_web/controllers/page_html/home.html.heex and you will
see the welcome page markup. Every template has access to @conn
(the request), any assigns you set, and layout components shared
across the app.
The outer chrome (the <html>, <head>, and <body> tags) comes from
lib/demo_web/components/layouts/root.html.heex. Layout and flash
handling is now managed by a tiny Layouts module so every page gets
the same shell without repeating HTML.
HEEx replaces the older .eex templates. Inside HEEx you
can write HTML as usual, embed Elixir expressions with { … } inside
attributes or {% = … %}-style blocks in bodies, and use function
components such as <.link /> and <.icon />. Do not write raw
<%= … %> tags: HEEx is strict and knows the HTML structure it is
rendering.
|
Feel free to edit the home template while the browser is open. Phoenix watches the file and live-reloads the page after each save.
Hello World!
Our goal: a dynamic page at http://localhost:4000/hello that simply prints "Hello World!". We will do it the idiomatic Phoenix 1.8 way, with a new route, a controller action, and a template.
If you do not already have a demo app running from the previous section, create one now:
$ mix phx.new demo --no-ecto
[...]
$ cd demo
$ mix phx.server
Step 1: add a route
Open lib/demo_web/router.ex and add one line:
defmodule DemoWeb.Router do
  use DemoWeb, :router

  [...]

  scope "/", DemoWeb do
    pipe_through :browser

    get "/", PageController, :home
    get "/hello", PageController, :hello (1)
  end

[...]| 1 | A new GET /hello route that points at the hello action of the
already-existing PageController. |
pipe_through :browser tells Phoenix to run every request in this
block through the :browser pipeline (session handling, CSRF protection,
and so on). We cover pipelines properly in the
Router chapter. For now just leave that line
where it is.
|
Step 2: add the controller action
Open lib/demo_web/controllers/page_controller.ex and add a matching
hello/2 function:
defmodule DemoWeb.PageController do
  use DemoWeb, :controller

  def home(conn, _params) do
    render(conn, :home)
  end

  def hello(conn, _params) do (1)
    render(conn, :hello)
  end
end| 1 | render(conn, :hello) renders the template called hello.html.heex
that belongs to PageHTML. |
Step 3: add the template
Create the file lib/demo_web/controllers/page_html/hello.html.heex:
<h1 class="text-3xl font-bold">Hello World!</h1>Open http://localhost:4000/hello in your browser. You should see the headline. Phoenix live-reloads on save, so no restart needed.

Hello World with its own controller
Sharing an action with PageController was fine for this tiny example.
In a real app, each concern usually gets its own controller. Let us
split the hello action into a dedicated ExampleController.
Update the router:
  scope "/", DemoWeb do
    pipe_through :browser

    get "/", PageController, :home
    get "/hello", ExampleController, :hello (1)
end| 1 | ExampleController is clearly not a production-worthy name. Feel
free to rename it once you see the pattern. |
Reload http://localhost:4000/hello. Phoenix will complain that the module does not exist. That is fine, the error message tells us exactly what to do: create the controller.
Create lib/demo_web/controllers/example_controller.ex:
defmodule DemoWeb.ExampleController do
  use DemoWeb, :controller

  def hello(conn, _params) do
    render(conn, :hello)
  end
end
Phoenix 1.8 auto-infers the HTML module (DemoWeb.ExampleHTML) from
the controller name. Create that module next:
defmodule DemoWeb.ExampleHTML do
  use DemoWeb, :html

  embed_templates "example_html/*"
end
The embed_templates "example_html/*" macro picks up every .heex
file under lib/demo_web/controllers/example_html/ and exposes each
one as a function component.
Finally, create the template itself:
<h1 class="text-3xl font-bold">Hello World!</h1>Reload the page, and you should see the greeting again, now served by the new dedicated controller.
Checklist for a new page
Every time you want to add a new page in a new controller, you take these four small steps:
-
Add a route in
lib/demo_web/router.ex. -
Add a controller at
lib/demo_web/controllers/<name>_controller.exwith the matching action. -
Add an HTML module at
lib/demo_web/controllers/<name>_html.exthat embeds its templates. -
Create the template file under
lib/demo_web/controllers/<name>_html/<action>.html.heex.
Phoenix’s error messages in development mode guide you through missing pieces one at a time. If you forget a step, the browser will tell you which file is missing next.
The conn Struct
In the MVC world, the controller runs your code and the template
displays the result. The controller has to pass data to the template
somehow; that vehicle is the %Plug.Conn{} struct, usually just called
conn.
Think of conn as the entire request-and-response context: incoming
headers, URL, parameters, and whatever data you choose to hand over
to the template. Every controller action gets a conn and must
return a conn.
Let us add a diagnostic route so we can actually look at one. In the
demo application:
  scope "/", DemoWeb do
    pipe_through :browser

    get "/", PageController, :home
    get "/inspect", PageController, :inspect (1)
    get "/playground", PageController, :playground
end| 1 | Two new routes pointing at new actions we are about to write. |
Add the inspect and playground actions to PageController:
defmodule DemoWeb.PageController do
  use DemoWeb, :controller

  def home(conn, _params) do
    render(conn, :home)
  end

  def inspect(conn, _params) do
    render(conn, :inspect)
  end

  def playground(conn, _params) do
    render(conn, :playground)
  end
end
Then create two HEEx templates next to the existing home.html.heex:
<pre class="whitespace-pre-wrap text-xs">
{inspect(@conn, pretty: true)} (1)
</pre>| 1 | HEEx prints the value of an Elixir expression with { … }. The
@conn assign is always available and holds the current request. |
<table>
  <tr><td>Host:</td><td>{@conn.host}</td></tr>
  <tr><td>Port:</td><td>{@conn.port}</td></tr>
</table>
Open http://localhost:4000/inspect and you will see the full conn
struct printed out. It is huge; we only ever need a small slice of it.
A trimmed excerpt looks roughly like this in Phoenix 1.8:
%Plug.Conn{
  adapter: {Bandit.Adapter, :...},
  assigns: %{},
  host: "localhost",
  method: "GET",
  owner: #PID<0.855.0>,
  params: %{},
  path_info: ["inspect"],
  port: 4000,
  remote_ip: {127, 0, 0, 1},
  request_path: "/inspect",
  scheme: :http,
  status: nil,
  ...
}
The adapter line now says Bandit.Adapter (Phoenix 1.8’s default
web server), not Plug.Cowboy.Conn.
|
Passing data to the template
Controllers put data into conn.assigns with assign/3. Templates
read it back using the @ shortcut.
defmodule DemoWeb.PageController do
  use DemoWeb, :controller

  def home(conn, _params) do
    render(conn, :home)
  end

  def inspect(conn, _params) do
    conn
    |> assign(:headline, "This is a test headline") (1)
    |> render(:inspect)
  end

  def playground(conn, _params) do
    headline = "This is a test headline"

    conn
    |> assign(:headline, headline) (2)
    |> render(:playground)
  end
end| 1 | assign/3 adds :headline to the assigns map on conn. It
returns the updated conn so you can pipe it into render. |
| 2 | Same idea, but with the headline computed in a separate variable first. |
Update the playground template to use the new assign:
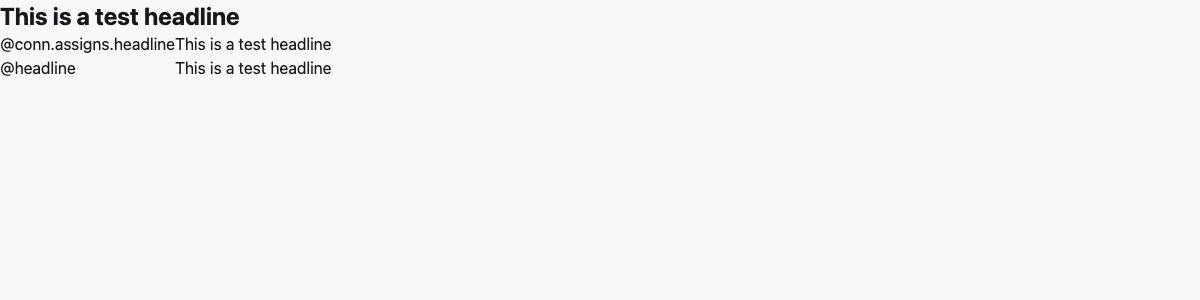
<h1 class="text-2xl font-bold">{@headline}</h1>

<table>
  <tr>
    <td>@conn.assigns.headline</td>
    <td>{@conn.assigns.headline}</td> (1)
  </tr>
  <tr>
    <td>@headline</td>
    <td>{@headline}</td> (2)
  </tr>
</table>| 1 | You can always reach into conn.assigns by its full path. |
| 2 | Every assign is also accessible via the @ shortcut. Prefer this
form, it is shorter and more readable. |
Static Clock
Right now, the page always says the same thing. The smallest possible step to make it dynamic is to show the current time.
[...]
def playground(conn, _params) do
  headline = "This is a test headline"
  {:ok, timestamp} = DateTime.now("Etc/UTC")

  conn
  |> assign(:headline, headline)
  |> assign(:timestamp, timestamp)
  |> render(:playground)
end
[...]
And the template:
<h1 class="text-2xl font-bold">{@headline}</h1>

<table>
  <tr>
    <td>Etc/UTC</td>
    <td>{@timestamp}</td>
  </tr>
</table>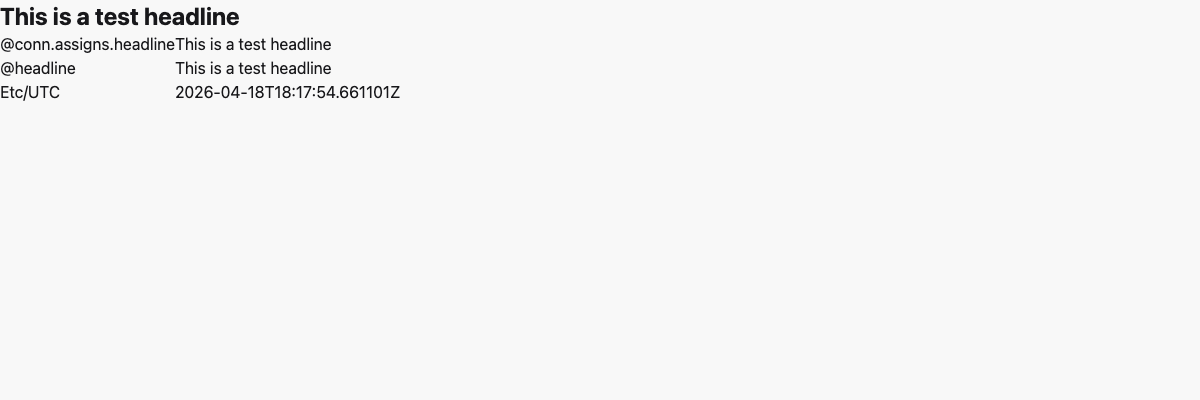
Refresh the page and the timestamp updates on every reload. For a clock that ticks without a manual reload, we will use LiveView in the next chapter.
Links
Webpages link to each other. Our next toy app is a two-page game of
ping-pong: /ping links to /pong and vice versa.
$ mix phx.new game --no-ecto
[...]
$ cd game
$ mix phx.server
Add the two routes:
  scope "/", GameWeb do
    pipe_through :browser

    get "/", PageController, :home
    get "/ping", PageController, :ping
    get "/pong", PageController, :pong
  end
The actions:
defmodule GameWeb.PageController do
  use GameWeb, :controller

  def home(conn, _params) do
    render(conn, :home)
  end

  def ping(conn, _params) do
    render(conn, :ping)
  end

  def pong(conn, _params) do
    render(conn, :pong)
  end
end
And the two templates:
<h1 class="text-3xl font-bold">Ping</h1><h1 class="text-3xl font-bold">Pong</h1>Now we need links between the two pages. We could hard-code
<a href="/pong">, but Phoenix gives us something better: verified
routes via the ~p sigil.
$ mix phx.routes | grep PageController
  GET  /       GameWeb.PageController :home
  GET  /ping   GameWeb.PageController :ping
  GET  /pong   GameWeb.PageController :pong
Update the two templates to link to each other with ~p:
<h1 class="text-3xl font-bold">Ping</h1>

<p>
  <.link href={~p"/pong"}>Pong!</.link> (1)
</p>| 1 | ~p"/pong" is a verified route. Phoenix checks it at compile
time against the router and errors out if the path does not exist.
Typos stop being a runtime surprise. |
<h1 class="text-3xl font-bold">Pong</h1>

<p>
  <.link href={~p"/ping"}>Ping!</.link>
</p>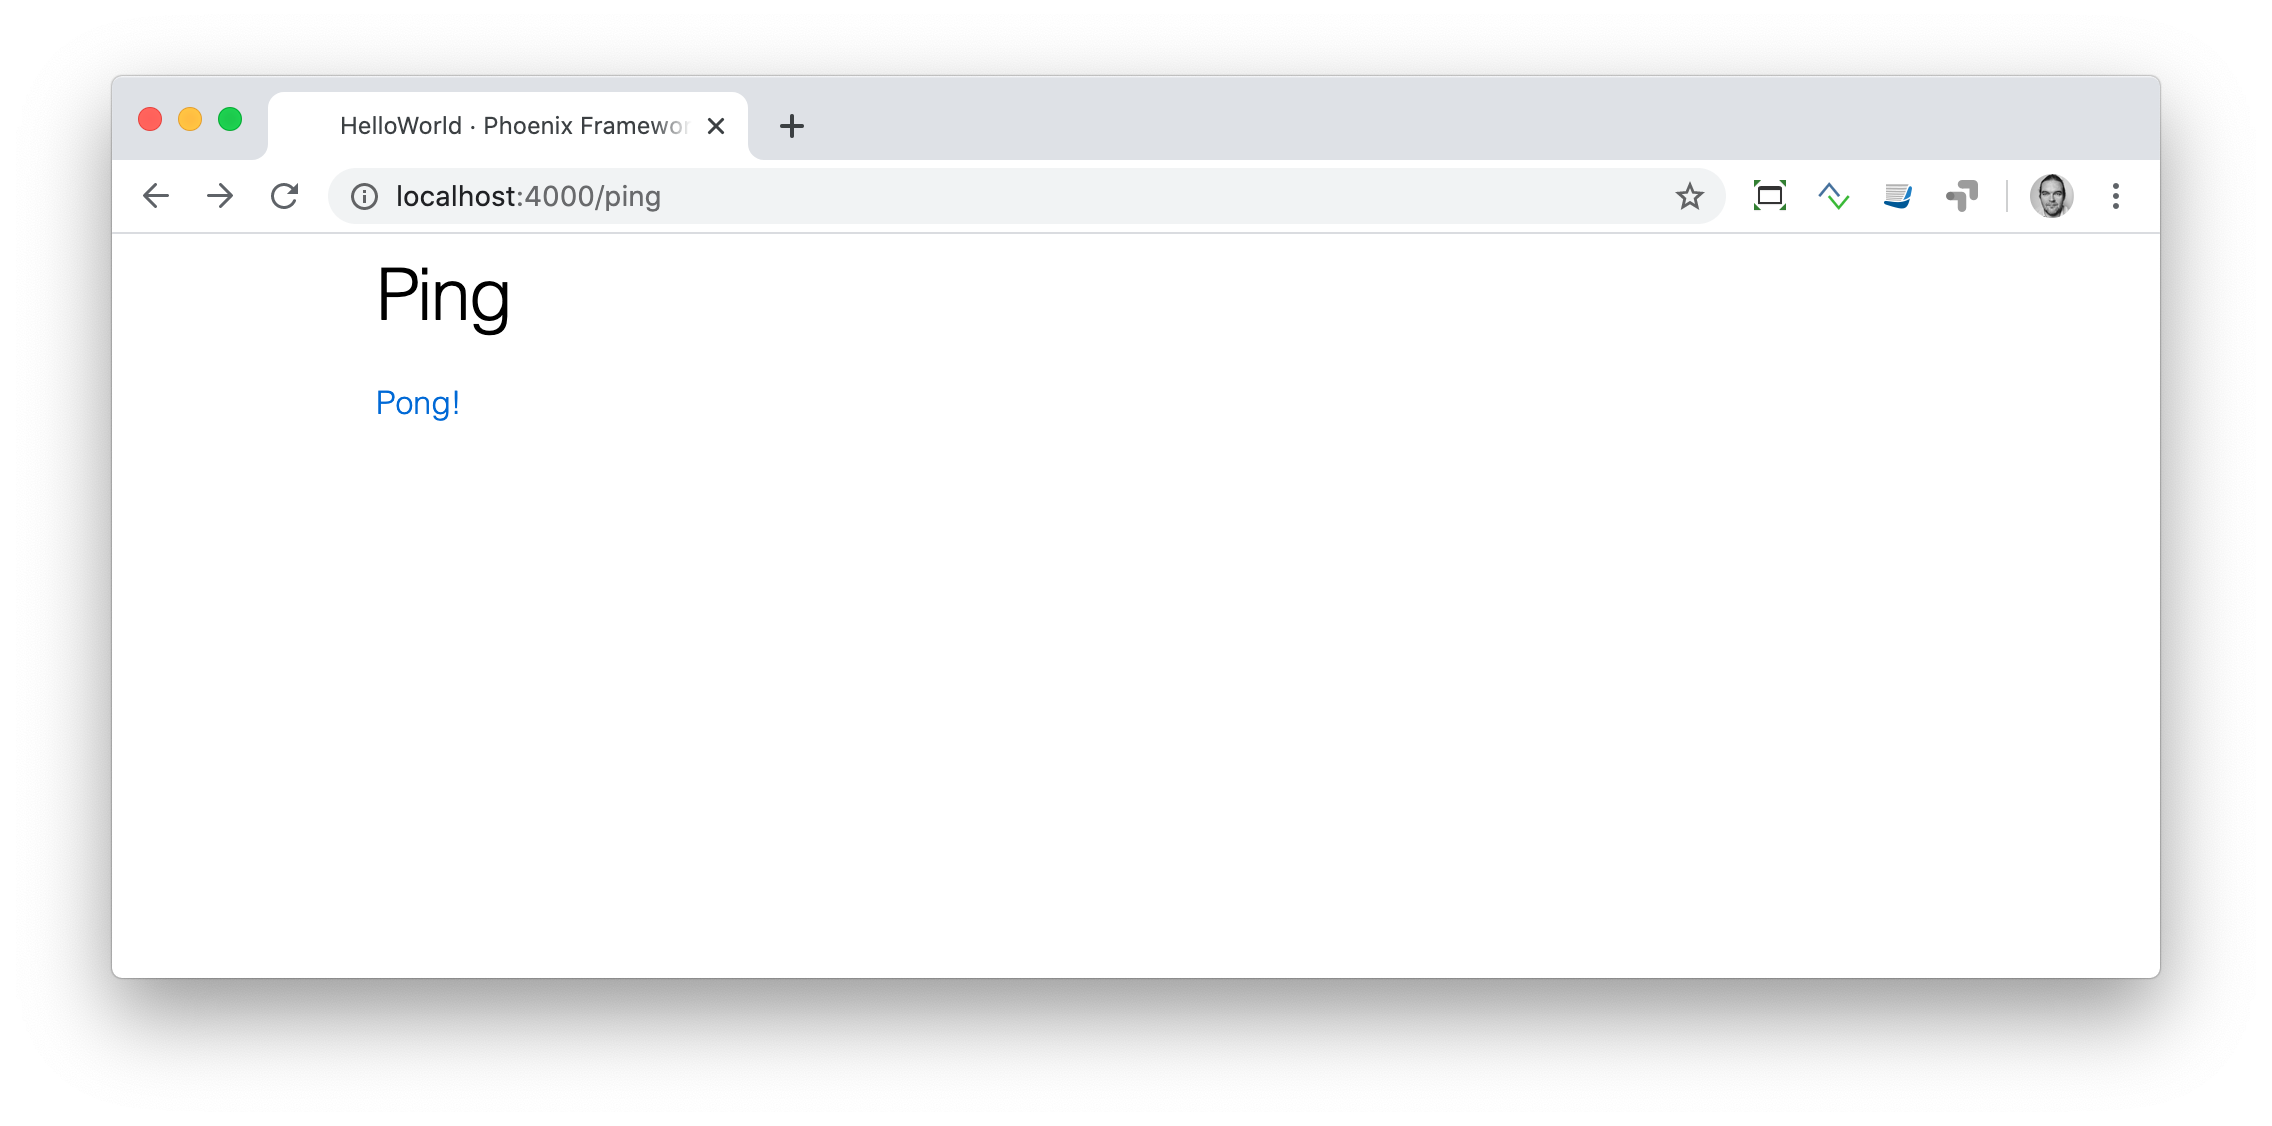
Now you can play HTML ping-pong by clicking back and forth.
| More on routes with parameters and query strings in the Router chapter. |
Adding a CSS class to a link
The <.link> component accepts any HTML attribute, including class:
<h1 class="text-3xl font-bold">Pong</h1>

<p>
  <.link href={~p"/ping"} class="btn btn-primary">Ping!</.link>
</p>
Since Phoenix 1.8 ships with Tailwind CSS and daisyUI out of the box,
classes like btn and btn-primary immediately produce a styled
button.
Static files
Static files (images, robots.txt, favicon.ico, PDFs, fonts, …) live
under priv/static/. Phoenix serves them directly, without running any
of your Elixir code.
$ tree priv/static
priv/static
├── favicon.ico
├── images
│   └── logo.svg
└── robots.txt
Two things control which files are exposed:
-
The list in
DemoWeb.static_paths/0(inlib/demo_web.ex), which declares which top-level folders underpriv/staticare public. -
The
Plug.Staticplug inlib/demo_web/endpoint.ex, which is already wired up for you.
If you add a brand-new directory like pdfs/, add it to
static_paths/0:
def static_paths, do: ~w(assets fonts images favicon.ico robots.txt pdfs) (1)| 1 | We added pdfs to the allow-list. |
Images
Images are just static files, so the rules above apply. The generator
places a Phoenix logo at priv/static/images/logo.svg which is already
exposed.
To render an image from a HEEx template, use a verified static path
with ~p"/images/…":
<img src={~p"/images/logo.svg"} alt="Phoenix Framework Logo" />CSS
Phoenix 1.8 generates projects with Tailwind CSS v4 and daisyUI v5 pre-wired. You write classes directly in your HEEx templates and the development server recompiles the stylesheet on save.
We do not dive deep into CSS in this book, but a minimal example:
<div class="card bg-base-200 p-6 max-w-sm">
  <h1 class="text-3xl font-bold">Ping</h1>
  <p class="mt-2">
    <.link class="btn btn-primary" href={~p"/pong"}>Pong!</.link>
  </p>
</div>
Reload the browser, and you will see a styled card with a blue button. Dark mode is handled automatically by Tailwind and daisyUI following the user’s system preference; there is no manual toggle needed.
If you want to override the generated assets/css/app.css, you can add
Tailwind @theme tokens or plain CSS, and the dev server will rebuild
the bundle on save.